Overview.
"Embedded Load Generator" is the most dynamic and flexible load generator
integrated with the Perforator platform allowing you to define
load testing scenarios directly in code.
You need advanced
Java
programming skills to utilize this load generator.
Also, it would be best if you have at least a basic understanding of the
Selenium
framework since the actual logic of the load testing scenarios is implemented via calling
RemoteWebDriver
directly.
All integrations with the Perforator platform are open-sourced.
Please take a look at our GitLab repository
"Perforator SDK Java"
if you are interested in the internal implementation of the load generator.
Configuration and execution of this load generator is done via a dedicated
Maven
plugin, while actual logic implementation is done via extending
AbstractSuiteProcessor
class.
The example below can give you a sense of what a real-world configuration might look like.
<plugin>
    <groupId>io.perforator.sdk</groupId>
    <artifactId>perforator-maven-plugin</artifactId>
    <version>1.7.1</version>
    <configuration>
        <apiClientId>YOUR_API_CLIENT_ID</apiClientId>
        <apiClientSecret>YOUR_API_CLIENT_SECRET</apiClientSecret>
        <projectKey>YOUR_PROJECT_KEY</projectKey>
        <processorClass>com.example.ExampleSuiteProcessor</processorClass>
        <concurrency>50</concurrency>
        <duration>5m</duration>
        <rampUp>1m</rampUp>
        <rampDown>30s</rampDown>
    </configuration>
</plugin>
public class ExampleSuiteProcessor extends AbstractSuiteProcessor {
@Override
protected void processSuite(long iterationNumber, String suiteInstanceID, EmbeddedSuiteConfig suiteConfig, RemoteWebDriver driver) {
transactionally("Open landing page and await to be loaded", () -> {
driver.navigate().to("https://verifications.perforator.io/");
awaitToBeVisible(driver, "#async-container");
});
transactionally("Verify page 1", () -> {
click(driver, "ul.navbar-nav li:nth-child(1) a");
awaitToBeVisible(driver, "#async-container");
});
transactionally("Verify page 2", () -> {
click(driver, "ul.navbar-nav li:nth-child(2) a");
awaitToBeVisible(driver, "#async-container");
});
}
}Jump Start.
Execute `mvn --version` in your terminal to validate both.
examples-embedded-release-1.7.1 % ./cloud-full-run.sh
[INFO] --- perforator-maven-plugin:1.7.1:embedded (default-cli) @ perforator-sdk-examples-embedded ---
[2022-02-02 14:03:52][INFO] - Created browser cloud a068942e-3218-4283-a4bb-a37bb32e2e6d
[2022-02-02 14:03:53][INFO] - Browser cloud is not ready yet. Status = QUEUED, RequestedBrowsers = 50, StartingBrowsers = 0, ReadyBrowsers = 0
[2022-02-02 14:03:59][INFO] - Browser cloud is not ready yet. Status = PROVISIONING, RequestedBrowsers = 50, StartingBrowsers = 0, ReadyBrowsers = 0
[2022-02-02 14:04:01][INFO] - Browser cloud is not ready yet. Status = PROVISIONING, RequestedBrowsers = 50, StartingBrowsers = 50, ReadyBrowsers = 0
[2022-02-02 14:04:42][INFO] - Browser cloud is not ready yet. Status = PROVISIONING, RequestedBrowsers = 50, StartingBrowsers = 38, ReadyBrowsers = 12
[2022-02-02 14:04:57][INFO] - Browser cloud is not ready yet. Status = PROVISIONING, RequestedBrowsers = 50, StartingBrowsers = 12, ReadyBrowsers = 38
[2022-02-02 14:04:58][INFO] - Browser cloud is not ready yet. Status = PROVISIONING, RequestedBrowsers = 50, StartingBrowsers = 0, ReadyBrowsers = 50
[2022-02-02 14:04:59][INFO] - Browser cloud is ready: selenium hub = https://selenium.perforator.io/---/---/wd/hub
 -------------------------------------------------------------------------------------------------------------------------------
|                                                                                                                               |
|    |||||||||||||||||||||||||||||||||||||||||||||||||||||||||||||||||||||||||||||||||||||||||||||||||||||||||||||||||||||||    |
|                                                                                                                               |
|                                              Load generation is about to start.                                               |
|                           Please open the link below in the browser to see statistics in real-time.                           |
|                                                                                                                               |
|         https://app.perforator.io/statistics/73df630c-86b4-40e0-8ab4-a4ac2e9ec373/56666124-b59f-451f-b763-ff36fe67f215        |
|                                                                                                                               |
|    |||||||||||||||||||||||||||||||||||||||||||||||||||||||||||||||||||||||||||||||||||||||||||||||||||||||||||||||||||||||    |
|                                                                                                                               |
 -------------------------------------------------------------------------------------------------------------------------------

[2022-02-02 14:04:59][INFO] - suites: active = 1, failed = 0, successful = 0; transactions: active = 2, failed = 0, successful = 0
[2022-02-02 14:05:14][INFO] - suites: active = 13, failed = 0, successful = 15; transactions: active = 26, failed = 0, successful = 102
[2022-02-02 14:05:35][INFO] - suites: active = 30, failed = 0, successful = 79; transactions: active = 60, failed = 0, successful = 5325
[2022-02-02 14:06:00][INFO] - suites: active = 50, failed = 0, successful = 247; transactions: active = 100, failed = 0, successful = 1566
[2022-02-02 14:07:01][INFO] - suites: active = 50, failed = 0, successful = 737; transactions: active = 100, failed = 0, successful = 4522
[2022-02-02 14:09:28][INFO] - suites: active = 50, failed = 0, successful = 1925; transactions: active = 100, failed = 0, successful = 11631
[2022-02-02 14:09:33][INFO] - suites: active = 15, failed = 0, successful = 1965; transactions: active = 30, failed = 0, successful = 11838
[2022-02-02 14:09:37][INFO] - Terminating browser cloud -> a068942e-3218-4283-a4bb-a37bb32e2e6d
[2022-02-02 14:09:37][INFO] - Browser cloud has been successfully terminated -> a068942e-3218-4283-a4bb-a37bb32e2e6d
[2022-02-02 14:09:37][INFO] - suites: active = 0, failed = 0, successful = 1980; transactions: active = 0, failed = 0, successful = 11880
[INFO] ------------------------------------------------------------------------
[INFO] BUILD SUCCESS
[INFO] ------------------------------------------------------------------------
[INFO] Total time:  05:48 min
[INFO] Finished at: 2022-02-02T14:09:37-06:00
[INFO] ------------------------------------------------------------------------
Maven Build.
Prebuilt example
comes with ready-to-use pom.xml where all dependencies and plugins are already configured.
It might be a case when you would like to integrate Embedded Load Generator into an existing
maven project or prefer to configure the build from the ground up, so please take a look at the instructions below.
1. All compiled and well-tested artifacts of the Perforator SDK are uploaded to
GitLab based maven repo.
Please update your pom.xml by adding
pluginRepositories
and
repositories pointed to our maven repo, so maven can automatically download all required artifacts.
<project>
    ...
    <pluginRepositories>
        ...
        <pluginRepository>
            <id>perforator-gitlab-maven</id>
            <url>https://gitlab.com/api/v4/projects/32457860/packages/maven</url>
            <snapshots>
                <enabled>false</enabled>
            </snapshots>
            <releases>
                <enabled>true</enabled>
            </releases>
        </pluginRepository>
        ...
    </pluginRepositories>
    ...
    <repositories>
        ...
        <repository>
            <id>perforator-gitlab-maven</id>
            <url>https://gitlab.com/api/v4/projects/32457860/packages/maven</url>
            <snapshots>
                <enabled>false</enabled>
            </snapshots>
            <releases>
                <enabled>true</enabled>
            </releases>
        </repository>
        ...
    </repositories>
    ...
</project>
2. Add perforator-sdk-load-generator-embedded artifact to your dependencies list, so required classes to implement your suite processor are available during compilation and execution phases.
<project>
    ...
    <dependencies>
        ...
        <dependency>
            <groupId>io.perforator.sdk</groupId>
            <artifactId>perforator-sdk-load-generator-embedded</artifactId>
            <version>1.7.1</version>
        </dependency>
        ...
    </dependencies>
    ...
</project>
3. Add perforator-maven-plugin to the build plugins section.
<project>
    ...
    <build>
        ...
        <plugins>
            ...
            <plugin>
                <groupId>io.perforator.sdk</groupId>
                <artifactId>perforator-maven-plugin</artifactId>
                <version>1.7.1</version>
                <configuration>
                    ...
                </configuration>
            </plugin>
            ...
        </plugins>
        ...
    </build>
    ...
</project>
Configuration.
EmbeddedLoadGenerator configuration and execution are done via a dedicated maven plugin perforator-maven-plugin.
There are four required settings to run this load generator:
-
apiClientId
- client ID for API authentication.
Please navigate to the
API Settings
page to get your API Client ID.
-
apiClientSecret
- client Secret for API authentication.
Please navigate to the
API Settings
page to get your API Client Secret.
-
projectKey
- identifier of the project to create new execution records.
Please refer to the
"Projects"
chapter to learn more about projects and get your project key.
-
processorClass
- fully qualified class name of the suite processor,
where a processor should either extend
AbstractSuiteProcessor
or implement
EmbeddedSuiteProcessor.
Additionally, the load generator supports many more optional settings allowing you to fine-tune load test execution.
Feel free to review all available options at the Settings tab.
There are two major sets of configuration options:
- Settings with the "Scope: loadGenerator" define the overall behavior of the load generator.
- Settings with the "Scope: suite" control behavior of the individual suite.
It might be a case when you would like to apply different load testing scenarios and control such scenarios independently.
Perforator maven plugin allows you to configure multiple suites where every suite is executed independently.
Please take a look at the three configurations below,
where the first two options define single suite execution,
while the third one allows you to run multiple suites independently.
<!-- Single suite configuration-->
<plugin>
    <groupId>io.perforator.sdk</groupId>
    <artifactId>perforator-maven-plugin</artifactId>
    <version>1.7.1</version>
    <configuration>
        <apiClientId>YOUR_API_CLIENT_ID</apiClientId>
        <apiClientSecret>YOUR_API_CLIENT_SECRET</apiClientSecret>
        <projectKey>YOUR_PROJECT_KEY</projectKey>
        <processorClass>com.example.ExampleSuiteProcessor</processorClass>
        <concurrency>50</concurrency>
        <duration>30m</duration>
    </configuration>
</plugin>
<!-- Single suite configuration-->
<plugin>
<groupId>io.perforator.sdk</groupId>
<artifactId>perforator-maven-plugin</artifactId>
<version>1.7.1</version>
<configuration>
<apiClientId>YOUR_API_CLIENT_ID</apiClientId>
<apiClientSecret>YOUR_API_CLIENT_SECRET</apiClientSecret>
<projectKey>YOUR_PROJECT_KEY</projectKey>
<suites>
<suite>
<processorClass>com.example.ExampleSuiteProcessor</processorClass>
<concurrency>50</concurrency>
<duration>30m</duration>
</suite>
</suites>
</configuration>
</plugin><!-- Multiple suites configuration-->
<plugin>
<groupId>io.perforator.sdk</groupId>
<artifactId>perforator-maven-plugin</artifactId>
<version>1.7.1</version>
<configuration>
<apiClientId>YOUR_API_CLIENT_ID</apiClientId>
<apiClientSecret>YOUR_API_CLIENT_SECRET</apiClientSecret>
<projectKey>YOUR_PROJECT_KEY</projectKey>
<suites>
<suite>
<processorClass>com.example.SuiteProcessorA</processorClass>
<concurrency>50</concurrency>
<duration>30m</duration>
</suite>
<suite>
<processorClass>com.example.SuiteProcessorB</processorClass>
<concurrency>30</concurrency>
<duration>25m</duration>
</suite>
</suites>
</configuration>
</plugin>Overrides.
Load generator uses the following order while resolving specific setting values:
1. Command line arguments.
2. Environment variables.
3. pom.xml setting.
This approach allows you to prepare a configuration file once and then execute it with different options.
A real-world example is when you store your project in a version control system like GIT, and you don't want to expose security keys.
So you can configure a new environment variable dedicated to the specific property, and a load generator automatically resolves it.
All Settings mention command-line argument and environment variable where an override is available.
For example, apiClientId has the following overrides:
- Command line arg: -DloadGenerator.apiClientId=...
- Environment variable: LOADGENERATOR_APICLIENTID=...
Suite Processor.
Suite processor is responsible for executing actual scenarios
and commands within remote browser, so it drives the logic of
the load test.
Every suite configuration of the embedded load generator requires
a dedicated implementation of the suite processor.
You have two options to develop a suite processor:
extend your class from
AbstractSuiteProcessor
or
implement it from
EmbeddedSuiteProcessor.
Note:
Implementing your suite instance from an interface
EmbeddedSuiteProcessor
provides you absolute freedom managing your own logic, but it comes with certain limitations.
You have to manually open a new
RemoteWebDriver session at the beginning of suite instance processing,
manually close it at the end, and manually report transactions of such activities.
So, it is suggested to extend from
AbstractSuiteProcessor,
since it automatically takes care of the "glue" activities.
Extending your suite processor implementation from AbstractSuiteProcessor
requires only one method override - processSuite,
where you implement your load test scenario logic.
Suite processor automatically passes the following parameters to your method implementation:
- iterationNumber
is suite iteration number.
It starts from 0 incrementing for every new suite instance execution.
Such counter is maintained on a suite level,
so counters from different suites are incremented independently.
- suiteInstanceID
is an ID of the invoked suite instance.
- suiteConfig
is a reference to the currently executed suite instance config.
- remoteWebDriver
is a reference to just opened
RemoteWebDriver,
which is automatically opened before suite instance processing starts and
automatically closed once suite instance processing is completed.
Please take a look at example suite processor implementation:
package com.example;

import io.perforator.sdk.loadgenerator.embedded.AbstractSuiteProcessor;
import io.perforator.sdk.loadgenerator.embedded.EmbeddedSuiteConfig;
import java.time.Duration;
import org.openqa.selenium.By;
import org.openqa.selenium.WebElement;
import org.openqa.selenium.remote.RemoteWebDriver;
import org.openqa.selenium.support.ui.ExpectedConditions;
import org.openqa.selenium.support.ui.WebDriverWait;

public class ExampleSuiteProcessor extends AbstractSuiteProcessor {

    private static final Duration DEFAULT_TIMEOUT = Duration.ofSeconds(30);

    @Override
    protected void processSuite(long iterationNumber, String suiteInstanceID, EmbeddedSuiteConfig suiteConfig, RemoteWebDriver driver) {
        transactionally("Open landing page and await to be loaded", () -> {
            driver.navigate().to("https://verifications.perforator.io/");
            awaitToBeVisible(driver, "#async-container", DEFAULT_TIMEOUT);
        });

        transactionally("Verify page 1", () -> {
            click(driver, "ul.navbar-nav li:nth-child(1) a", DEFAULT_TIMEOUT);
            awaitToBeVisible(driver, "#async-container", DEFAULT_TIMEOUT);
        });
    }

    private static WebElement awaitToBeVisible(RemoteWebDriver driver, String cssSelector, Duration timeout) {
        return new WebDriverWait(driver,timeout.toSeconds()).until(
                ExpectedConditions.visibilityOfElementLocated(
                        By.cssSelector(cssSelector)
                )
        );
    }

    private static WebElement click(RemoteWebDriver driver, String cssSelector, Duration timeout) {
        WebElement element = new WebDriverWait(driver,timeout.toSeconds()).until(
                ExpectedConditions.elementToBeClickable(
                        By.cssSelector(cssSelector)
                )
        );
        element.click();
        return element;
    }

}
Transactions.
Embedded load generator automatically reports suite instance processing as Top-Level transaction,
where a transaction name is generated as "suite - ${suite.name}".
Suite name is automatically generated from
processorClass
if you don't directly supply suite name.
For example, if you have a suite processor com.example.ExampleSuiteProcessor,
then a top-level transaction for suite instance processing should be generated as
"suite - com.example.ExampleSuiteProcessor".
Additionally, AbstractSuiteProcessor automatically reports
nested transactions related to opening and closing RemoteWebDriver session:
- "Open browser session".
- "Close browser session".
You can also report manual transactions if you would like to measure performance of the specific code blocks.
Such manually reported transactions have the following characteristics:
- Parent Transaction ID is automatically picked from the top-level transaction.
- Parent Transaction Name is automatically picked from the top-level transaction.
- Transaction ID is automatically generated in UUID format.
- Transaction Name is the name of transaction you manually supply.
- Transaction Type is a constant value of "Nested".
- Session ID is automatically picked from the browser session.
Note:
Load generator submits transactions to the analytical system only when you execute your load test using browsers in the cloud.
For example, no transactions are reported if
webDriverMode = local,
which is a case for local.sh and local.cmd scripts.
Please take a look at the examples below on how to report transactions manually:
package com.example;

import io.perforator.sdk.loadgenerator.embedded.AbstractSuiteProcessor;
import io.perforator.sdk.loadgenerator.embedded.EmbeddedSuiteConfig;
import org.openqa.selenium.By;
import org.openqa.selenium.WebElement;
import org.openqa.selenium.remote.RemoteWebDriver;
import org.openqa.selenium.support.ui.ExpectedConditions;
import org.openqa.selenium.support.ui.WebDriverWait;

public class ExampleSuiteProcessor extends AbstractSuiteProcessor {

    @Override
    protected void processSuite(long iterationNumber, String suiteInstanceID, EmbeddedSuiteConfig suiteConfig, RemoteWebDriver driver) {
        // Report a transaction for Runnable block
        transactionally("Your transaction name #1", () -> {
            driver.navigate().to("https://verifications.perforator.io/");
            awaitToBeVisible(driver, "#async-container");
        });

        // Report a transaction for Supplier block
        WebElement container = transactionally("Your transaction name #2", () -> {
            driver.navigate().to("https://verifications.perforator.io/");
            return awaitToBeVisible(driver, "#async-container");
        });
    }

    private static WebElement awaitToBeVisible(RemoteWebDriver driver, String cssSelector) {
        return new WebDriverWait(driver,30).until(
                ExpectedConditions.visibilityOfElementLocated(
                        By.cssSelector(cssSelector)
                )
        );
    }

}So, please call Perforator#transactionally to report transactions from classes other than AbstractSuiteProcessor.
package com.example;

import io.perforator.sdk.loadgenerator.embedded.AbstractSuiteProcessor;
import io.perforator.sdk.loadgenerator.embedded.EmbeddedSuiteConfig;
import org.openqa.selenium.remote.RemoteWebDriver;

public class ExampleSuiteProcessor extends AbstractSuiteProcessor {

    private final ExampleService service = new ExampleService();

    @Override
    protected void processSuite(long iterationNumber, String suiteInstanceID, EmbeddedSuiteConfig suiteConfig, RemoteWebDriver driver) {
        service.executeScenario(driver);
    }

}
package com.example;
import io.perforator.sdk.loadgenerator.core.Perforator;
import org.openqa.selenium.By;
import org.openqa.selenium.WebElement;
import org.openqa.selenium.remote.RemoteWebDriver;
import org.openqa.selenium.support.ui.ExpectedConditions;
import org.openqa.selenium.support.ui.WebDriverWait;
public class ExampleService {
public void executeScenario(RemoteWebDriver driver) {
// Report a transaction for Runnable block
Perforator.transactionally("Your transaction name #1", () -> {
driver.navigate().to("https://verifications.perforator.io/");
awaitToBeVisible(driver, "#async-container");
});
// Report a transaction for Supplier block
WebElement container = Perforator.transactionally("Your transaction name #2", () -> {
driver.navigate().to("https://verifications.perforator.io/");
return awaitToBeVisible(driver, "#async-container");
});
}
private static WebElement awaitToBeVisible(RemoteWebDriver driver, String cssSelector) {
return new WebDriverWait(driver,30).until(
ExpectedConditions.visibilityOfElementLocated(
By.cssSelector(cssSelector)
)
);
}
}Logging.
All "embedded" examples come with the prebuilt log4j2.xml configuration file, so you can easily fine-tune the logging of your load test.
Please take a look at the default logging config below.
<?xml version="1.0" encoding="UTF-8"?>
<Configuration
    xmlns:xsi="http://www.w3.org/2001/XMLSchema-instance" strict="true"
    xmlns="http://logging.apache.org/log4j/2.0/config"
    xsi:schemaLocation="http://logging.apache.org/log4j/2.0/config
    https://raw.githubusercontent.com/apache/logging-log4j2/master/log4j-core/src/main/resources/Log4j-config.xsd"
>
    <Appenders>
        <Console name="Console" target="SYSTEM_OUT">
            <PatternLayout pattern="[%d][%X{X-PERFORATOR-CONTEXT}][%c{1}][%4p] - %m%n"/>
        </Console>
    </Appenders>
    <Loggers>
        <Root level="info">
            <AppenderRef ref="Console"/>
        </Root>
        <Logger name="org.openqa.selenium" level="error" />
    </Loggers>
</Configuration>- logWorkerID - it adds worker ID to the logging context of the current thread.
- logSuiteInstanceID - it adds suite instance ID to the logging context of the current thread.
- logRemoteWebDriverSessionID - it adds browser session ID to the logging context of the current thread.
- logTransactionID - it adds currently active transaction ID to the logging context of the current thread.
Note: It is not suggested to change the logging level to DEBUG or TRACE when you run your load test at full speed because it will log too much information, and process output might become too overloaded, so please use it at your own risk.
Running.
There is no enforced workflow on how to prepare and execute a load test, but here is a suggested one:
1. Make necessary changes in the perforator-maven-plugin configuration.
2. Make necessary changes in your suite processor class.
3. Verify changes using local browsers.
4. Dry run your changes using a small number of remote browsers and ensure that all browser actions are not affected by network delays.
5. Execute your load test at full speed
Please take a look at the scripts below prepared for the suggested workflow.
- local.sh - executes your suite processor using Chrome browsers started locally. This script is helpful to verify that everything works as intended visually.
- local-headless.sh - it has the same purpose as local.sh, but valuable for CI/CD environments where a graphical environment is unavailable.
- local-debug.sh - it executes the logic using maven in debug mode, so you can attach external debugger from your IDE.
- cloud-dry-run.sh - it executes your suite processor using only 10 browsers started in the cloud. The main idea of this script is to avoid extra charges when you need to ensure that your logic is executed correctly using cloud-based browsers. For example, it is not optimal to run your full-powered test using thousands of browsers and then, in a minute, realize that you have a simple mistake in css selector.
- cloud-full-run.sh - it executes your load test at full speed as defined in maven plugin configuration.
- local.cmd - executes your suite processor using Chrome browsers started locally. This script is helpful to verify that everything works as intended visually.
- local-headless.cmd - it has the same purpose as local.sh, but valuable for CI/CD environments where a graphical environment is unavailable.
- local-debug.cmd - it executes the logic using maven in debug mode, so you can attach external debugger from your IDE.
- cloud-dry-run.cmd - it executes your suite processor using only 10 browsers started in the cloud. The main idea of this script is to avoid extra charges when you need to ensure that your logic is executed correctly using cloud-based browsers. For example, it is not optimal to run your full-powered test using thousands of browsers and then, in a minute, realize that you have a simple mistake in css selector.
- cloud-full-run.cmd - it executes your load test at full speed as defined in maven plugin configuration.
Feel free to execute maven commands directly in the terminal for more granular control.
For example: `mvn clean test-compile perforator:embedded -Dsuite.webDriverMode=cloud -Dsuite.concurrency=10`
Execute `mvn --version` in your terminal to validate both.
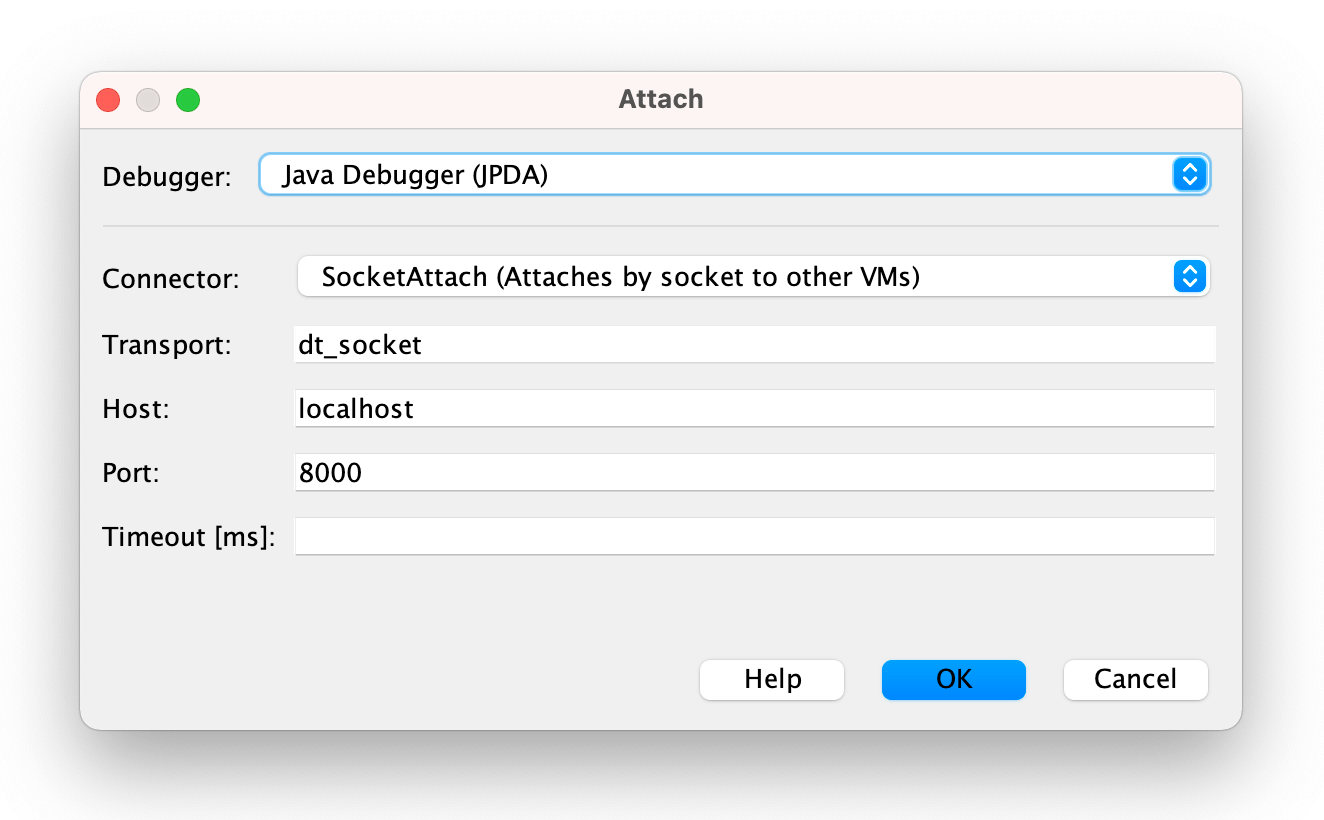
Debugging.
You can execute local-debug.sh(on Linux/macOS) or local-debug.cmd(on Windows) prebuilt scripts in your terminal, and it will start the maven process in debug mode so that you can attach an external debugger from your IDE.
Please use the following settings while attaching an external debugger to the maven process:
- transport: dt_socket
- host: localhost
- port: 8000
Note: It is not recommended to attach a debugger when running your suite(s) using browsers in the cloud, i.e., webDriverMode = cloud.
Cloud-based browsers are automatically killed if there is no activity within 60 seconds, so the debugger's extended blockage of the suite processor thread will automatically lead to remote browser termination.
examples-embedded-release-1.7.1 % ./local-debug.sh
Preparing to execute Maven in debug mode
Listening for transport dt_socket at address: 8000
[INFO] --- perforator-maven-plugin:1.7.1:embedded (default-cli) @ perforator-sdk-examples-embedded ---
[2022-02-10 04:53:44][INFO] - Using chromedriver 98.0.4758.80 (resolved driver for Chrome 98)
[2022-02-10 04:53:44][INFO] - Exporting webdriver.chrome.driver as /Users/max/.cache/selenium/chromedriver/mac64/98.0.4758.80/chromedriver
[2022-02-10 04:53:48][INFO] - suites: active = 1, failed = 0, successful = 0; transactions: active = 1, failed = 0, successful = 1
[2022-02-10 04:53:53][INFO] - suites: active = 1, failed = 0, successful = 0; transactions: active = 1, failed = 0, successful = 1
Limitations.
While browsers generating the load on your website are running in the cloud, the load generator itself is executed locally and is only responsible for orchestrating remote browsers.
Such behavior comes with certain requirements applied on local hardware and internet connection speed.
Here are minimal requirements to orchestrate every 500 remote browsers:
- 2 CPU cores
- 2 GB RAM
- 20 Mbps Internet bandwidth
For example, you need the following resources locally to run a load test with 2000 remote browsers:
- CPU cores: 2000 ÷ 500 × 2 Cores = 8 Cores
- RAM: 2000 ÷ 500 × 2GB = 8 GB
- Internet: 2000 ÷ 500 × 20Mbps = 80 Mbps
Warning: You might see very confusing load test statistics and high errors rate if you don't meet minimal hardware and internet bandwidth requirements.